In this article we are going to see all about the WordPress plugin Application Passwords.
Create different applications with unique passwords for any user to manage the REST API & XML requests.
Table of Content
Overview Overview
In simple basic authentication REST API & XML-RPC request we use the username and the password of the WordPress user.
Application Passwords provide a way to create multiple applications for each user to perform REST API authenticate requests without using users’ original passwords.
We have another plugin JSON Basic Authentication which allows us to perform basic authentication requests.
But JSON Basic Authentication uses the actual user password which is basically not useful for the live site.
Read more about performing basic authentication requests with JSON basic authentication plugin.
NOTE: Application Passwords is a Beta plugin in WordPress. So, I recommend avoiding using it on production sites. See all beta plugins in WordPress.
Advertisement
Features Features
- The application password generates a unique password for each application.
- We can able to create multiple applications for each user.
- We can remove any application at any time.
- No need for users’ original passwords for authentication.
NOTE: Application Passwords are ONLY used for authenticating REST API and XML-RPC requests. It will not work for regular site login.
Advertisement
How to install? How to install?
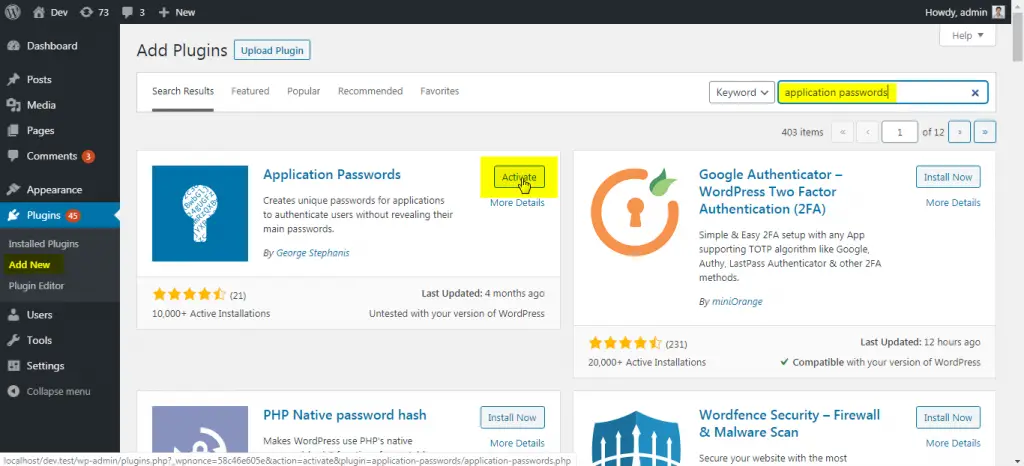
Follow below steps to install the Application Passwords.
- Go to Plugins ? Add new
- Search for Application Passwords
- Click on Install Now
- and then click on Activate button
See below screenshot for reference:
Create an application for the user Create an application for the user
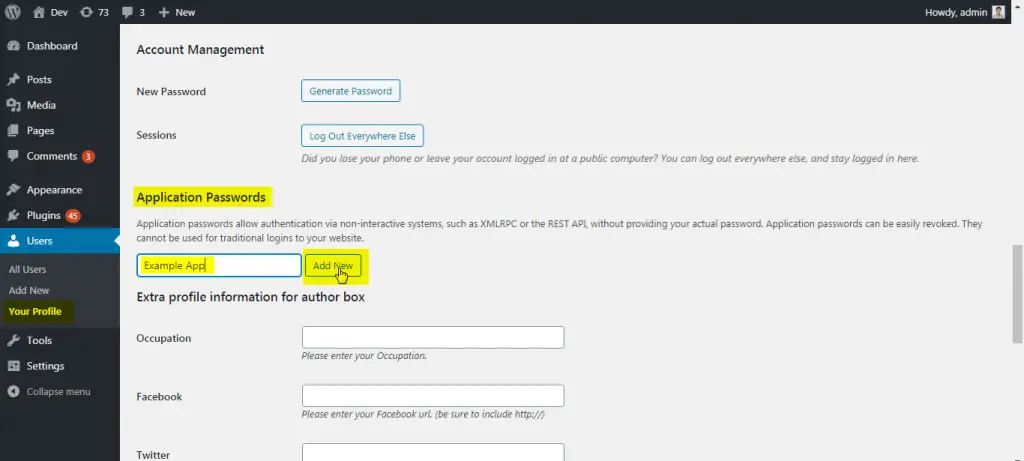
To create a application password follow below steps:
- Go to Users ? Your Profile
- Navigate to the Application Passwords section
- In the input field add your application name. I have named my application as “Example App“
- Click on Add New
Checkout below screenshot for reference:
After clicking on Add new we can see the popup which show the message something like below:
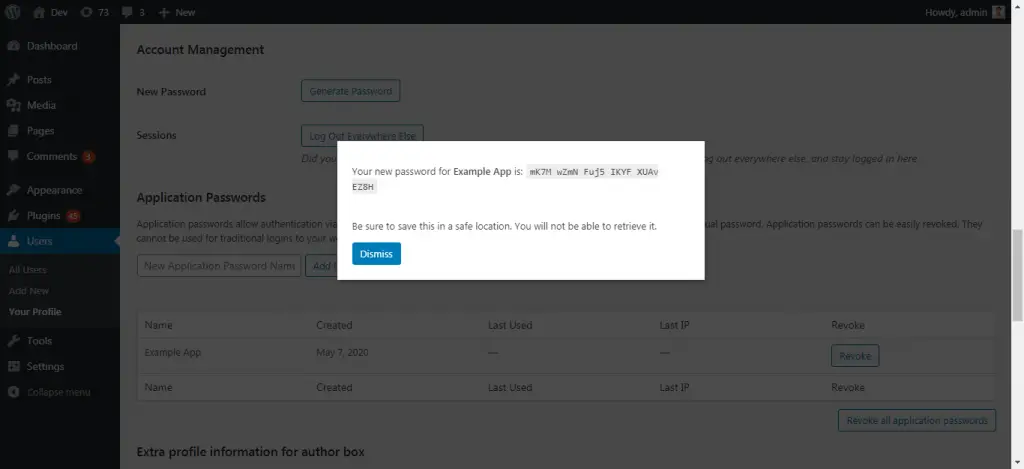
Here my application password is generated as: mK7M wZmN Fuj5 IKYF XUAv EZ8H
NOTE: Save this application password. Because we’ll not see this anymore. If somehow you close it then you need to create new one.
Advertisement
Examples of Application Passwords Examples of Application Passwords
Lets see how to use the Application Passwords with practical examples.
Here, I’m using Postman, CURL & wp_remote_post to demonstrate how we can create a new post with a Rest API request.
Create a post with Postman Create a post with Postman
- Open Postman
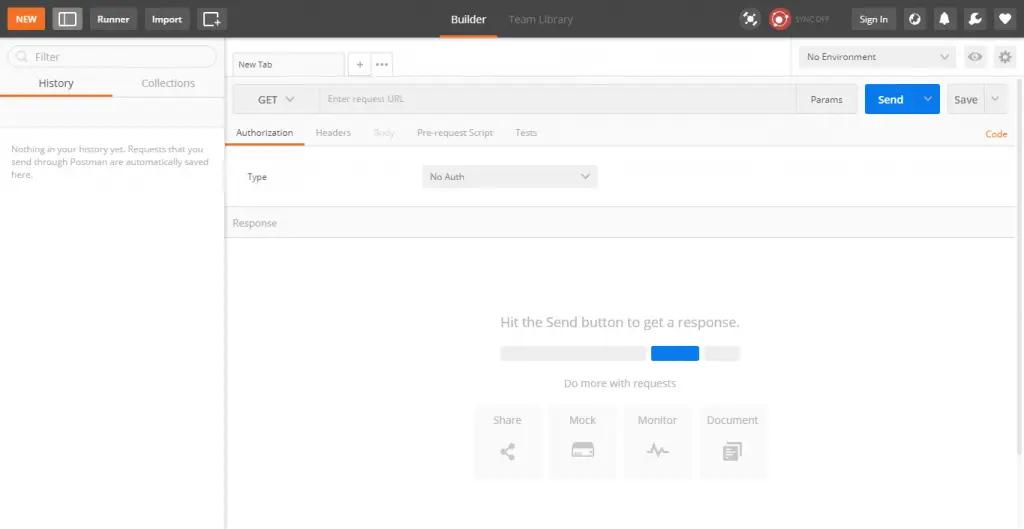
- Select GET method
- Use your website URL http://example.com/wp-json/wp/v2/posts/
- Click on Send
You will see something like:
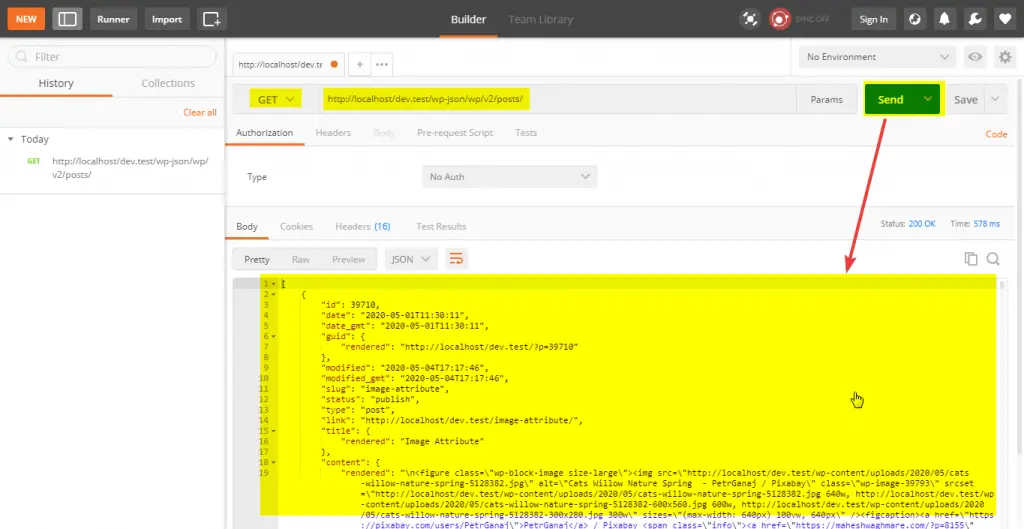
Here, We have not used Application Password anywhere. We have just got the list of all posts to check the Rest API is enabled or not on our website.
Most of the times Rest API is disabled by security plugins. So, you can enable the Rest API support form them.
Advertisement
We have now created a application passwords. So we can use it to send the Basic authentication request.
In this example we are going to create a new post with Basic authentication.
To create the post we can need to use endpoint http://example.com/wp-json/wp/v2/posts/.
In this example i’m just using only the title field to create a new post title.
You can see all available fields at – https://developer.wordpress.org/rest-api/reference/posts/#create-a-post
Lets see how to do it.
- Set the POST method
- Add endpoint with title parameter and add post title like –
/wp-json/wp/v2/posts/?title=Rest API Post 1 - Select Authentication type Basic auth
- Add your username
- Add your application password
Note: Here the username is which you use to login to your website. And application password is newly created application password. Im my case it is mK7M wZmN Fuj5 IKYF XUAv EZ8H.
- Click on Send button.
you can see something like
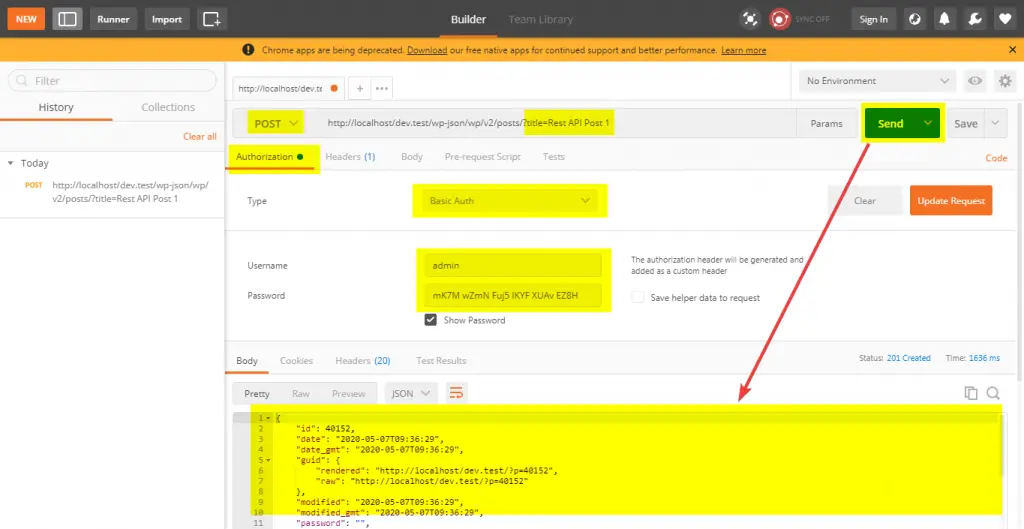
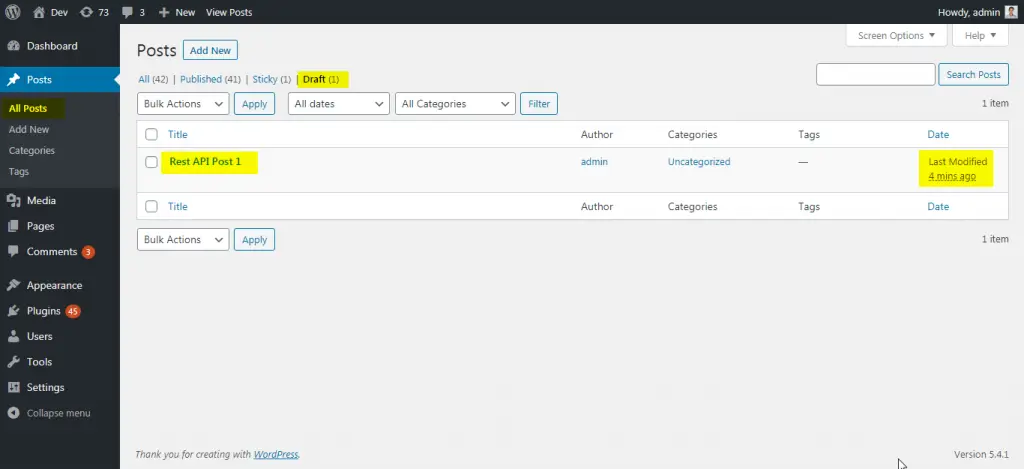
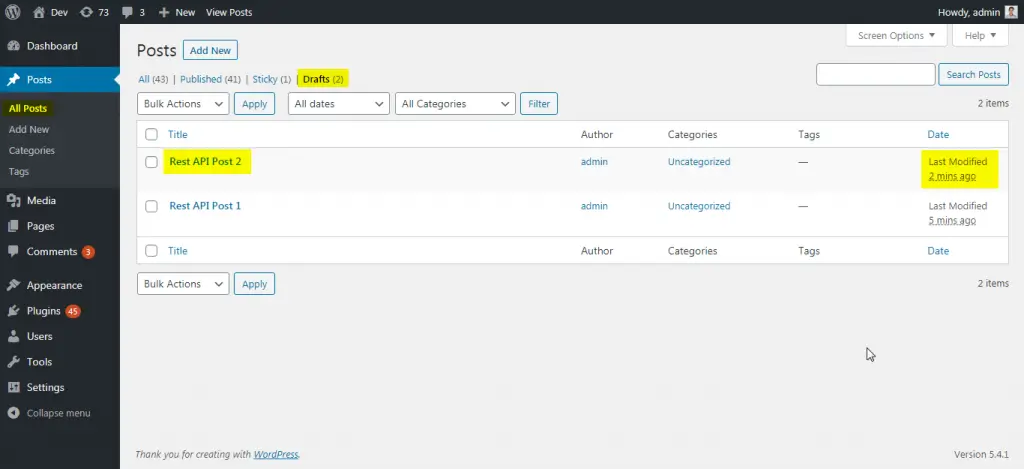
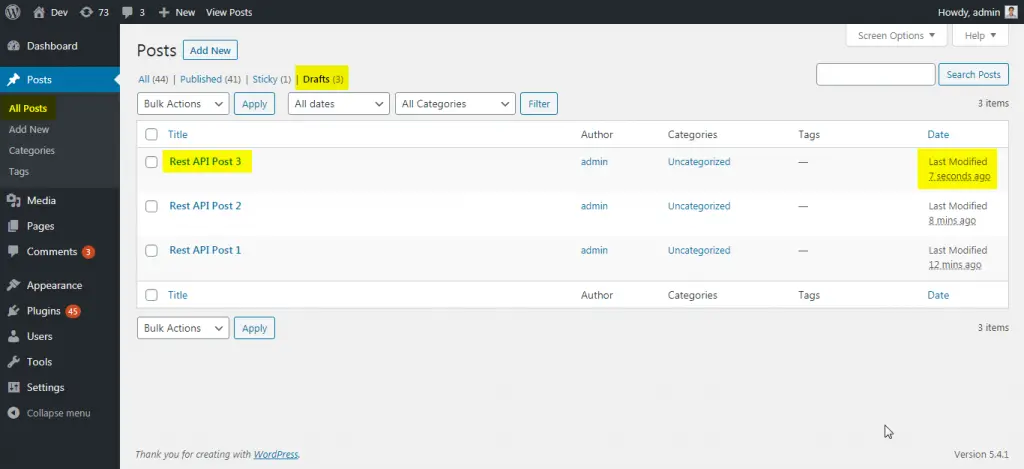
Now open your draft posts list. You can see our newly created post there.
E.g.
Advertisement
Create a post with CURL Create a post with CURL
Syntax
curl --user "admin:{application password}" -X POST -d "title={Post Title}" http://example.com/wp-json/wp/v2/posts/
Example
Output:
{"id":40155,"date":"2020-05-07T09:45:06","date_gmt":"2020-05-07T09:45:06","guid":{"rendered":"http:\/\/localhost\/dev.test\/?p=40155","raw":"http:\/\/localhost\/dev.test\/?p=40155"},"modified":"2020-05-07T09:45:06","modified_gmt":"2020-05-07T09:45:06","password":"","slug":"","status":"draft","type":"post","link":"http:\/\/localhost\/dev.test\/?p=40155","title":{"raw":"Rest API Post 2","rendered":"Rest API Post 2"},"content":{"raw":"","rendered":"","protected":false,"block_version":0},"excerpt":{"raw":"","rendered":"","protected":false},"author":1,"featured_media":0,"comment_status":"open","ping_status":"open","sticky":false,"template":"","format":"standard","meta":{"_kad_post_transparent":"","_kad_post_title":"","_kad_post_layout":"","_kad_post_sidebar_id":"","_kad_post_content_style":"","_kad_post_vertical_padding":"","_kad_post_feature":"","_kad_post_feature_position":"","_kad_post_header":false,"_kad_post_footer":false},"categories":[1],"tags":[],"permalink_template":"http:\/\/localhost\/dev.test\/%postname%\/","generated_slug":"rest-api-post-1","_links":{"self":[{"href":"http:\/\/localhost\/dev.test\/wp-json\/wp\/v2\/posts\/40155"}],"collection":[{"href":"http:\/\/localhost\/dev.test\/wp-json\/wp\/v2\/posts"}],"about":[{"href":"http:\/\/localhost\/dev.test\/wp-json\/wp\/v2\/types\/post"}],"author":[{"embeddable":true,"href":"http:\/\/localhost\/dev.test\/wp-json\/wp\/v2\/users\/1"}],"replies":[{"embeddable":true,"href":"http:\/\/localhost\/dev.test\/wp-json\/wp\/v2\/comments?post=40155"}],"version-history":[{"count":0,"href":"http:\/\/localhost\/dev.test\/wp-json\/wp\/v2\/posts\/40155\/revisions"}],"wp:attachment":[{"href":"http:\/\/localhost\/dev.test\/wp-json\/wp\/v2\/media?parent=40155"}],"wp:term":[{"taxonomy":"category","embeddable":true,"href":"http:\/\/localhost\/dev.test\/wp-json\/wp\/v2\/categories?post=40155"},{"taxonomy":"post_tag","embeddable":true,"href":"http:\/\/localhost\/dev.test\/wp-json\/wp\/v2\/tags?post=40155"}],"wp:action-publish":[{"href":"http:\/\/localhost\/dev.test\/wp-json\/wp\/v2\/posts\/40155"}],"wp:action-unfiltered-html":[{"href":"http:\/\/localhost\/dev.test\/wp-json\/wp\/v2\/posts\/40155"}],"wp:action-sticky":[{"href":"http:\/\/localhost\/dev.test\/wp-json\/wp\/v2\/posts\/40155"}],"wp:action-assign-author":[{"href":"http:\/\/localhost\/dev.test\/wp-json\/wp\/v2\/posts\/40155"}],"wp:action-create-categories":[{"href":"http:\/\/localhost\/dev.test\/wp-json\/wp\/v2\/posts\/40155"}],"wp:action-assign-categories":[{"href":"http:\/\/localhost\/dev.test\/wp-json\/wp\/v2\/posts\/40155"}],"wp:action-create-tags":[{"href":"http:\/\/localhost\/dev.test\/wp-json\/wp\/v2\/posts\/40155"}],"wp:action-assign-tags":[{"href":"http:\/\/localhost\/dev.test\/wp-json\/wp\/v2\/posts\/40155"}],"curies":[{"name":"wp","href":"https:\/\/api.w.org\/{rel}","templated":true}]}}
E.g.
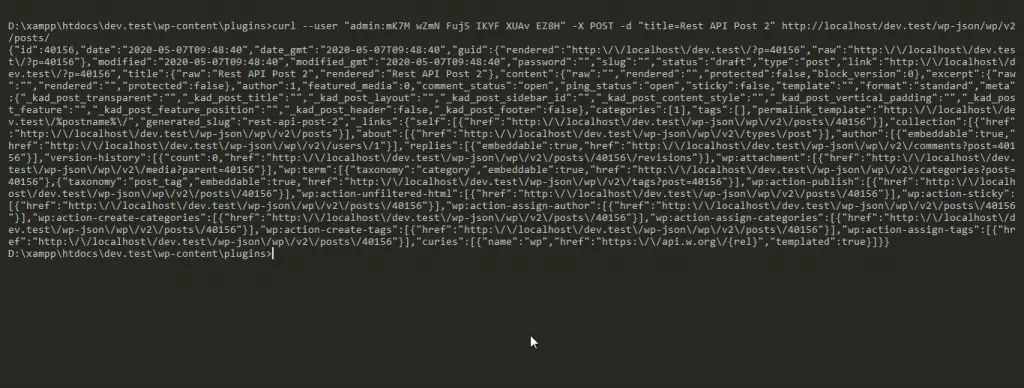
Output
Advertisement
Create a post with wp_remote_post Create a post with wp_remote_post
Code:
Output –
Common Error & Solution Common Error & Solution
If somehow your server have not added the HTTP Authentication support then you can see something below error:
Due to a potential server misconfiguration, it seems that HTTP Basic Authorization may not work for the REST API on this site: Authorization headers are not being sent to WordPress by the webserver. You can learn more about this problem, and a possible solution, on our GitHub Wiki.
Advertisement
Solution
We need to add it from yourself into the .htaccess file. Add below code into your
RewriteRule .* - [E=REMOTE_USER:%{HTTP:Authorization}]
After adding above code into .htaccess file we can use any application passwords.
Performing Basic Authentication Rest API requests in WordPress with Application Passwords.
Tweet


Thanks foor writing this
Thanks foor writing this